What Reports are available at the account level?
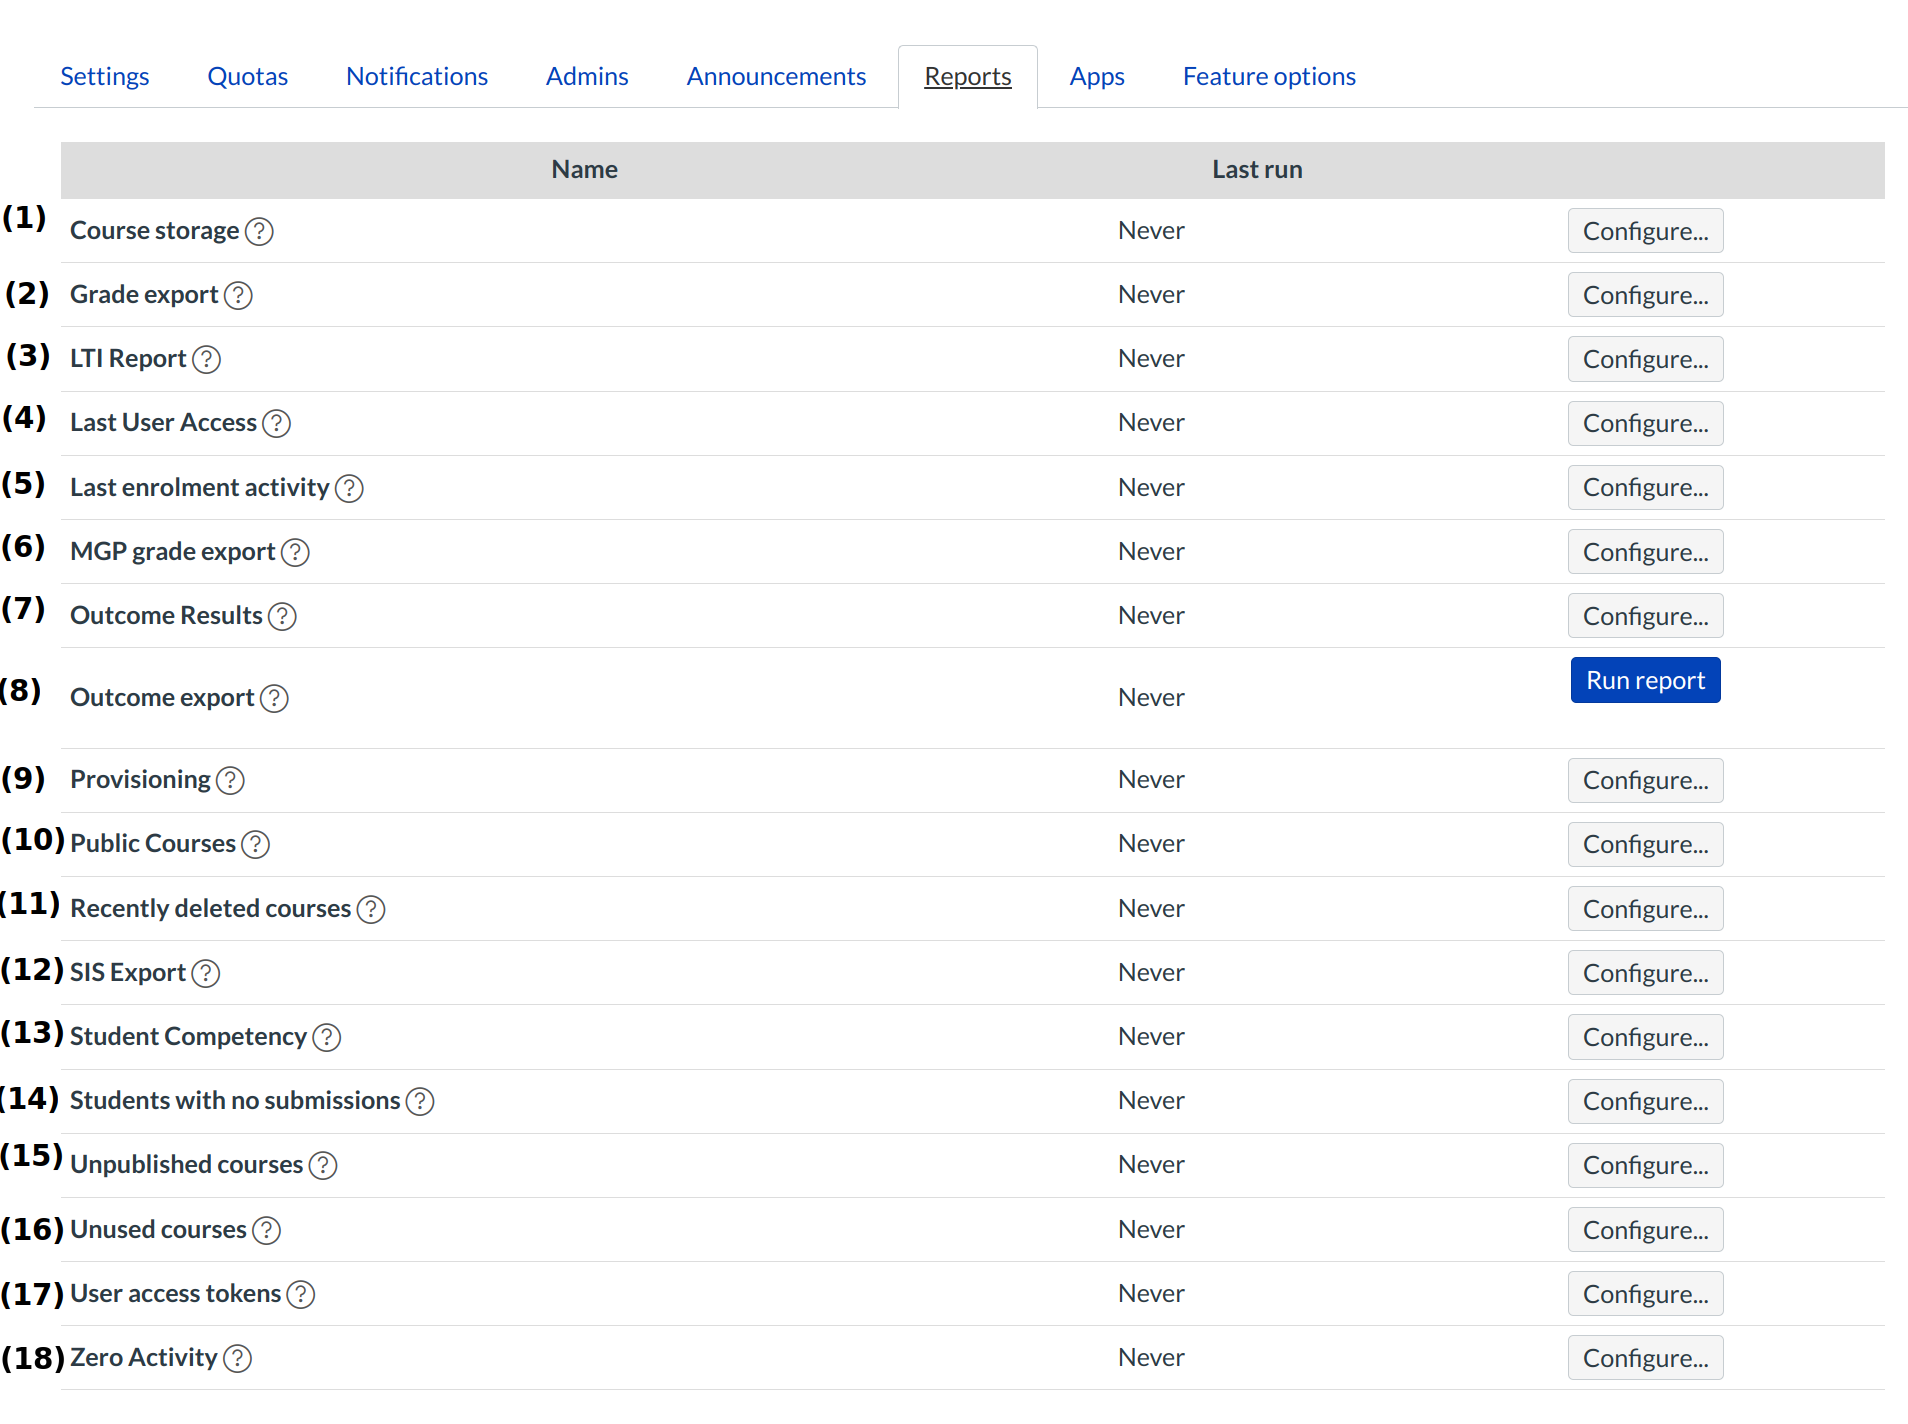
Account-level admins have access to 11 standard Sublime LMS ™ reports. This lesson describes these standard reports, though other customized reports may be included for your institution.
Open Account
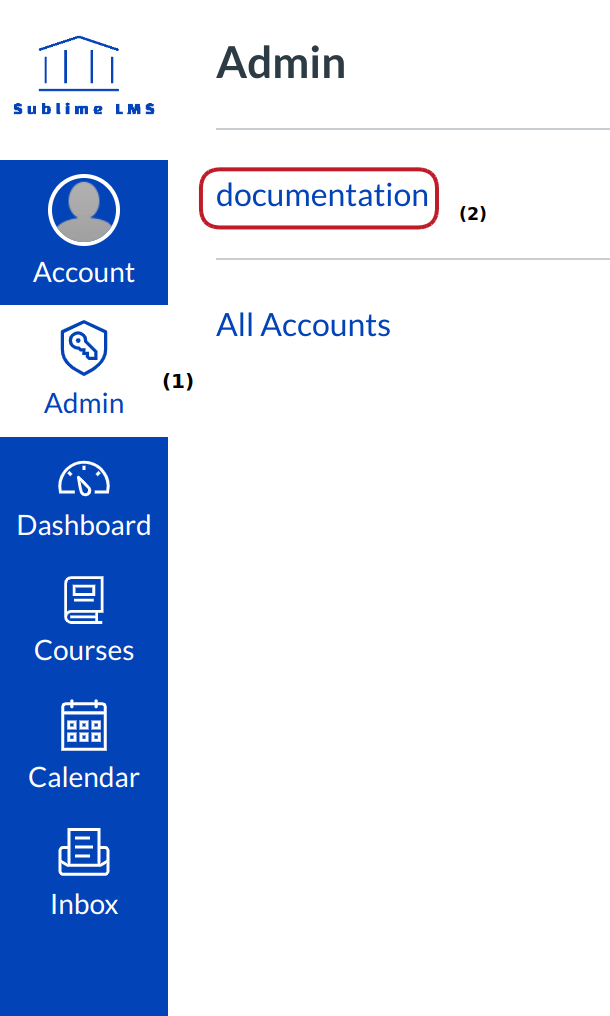
In Global Navigation, click the Admin menu [1], then click the name of the account [2].
Open Settings
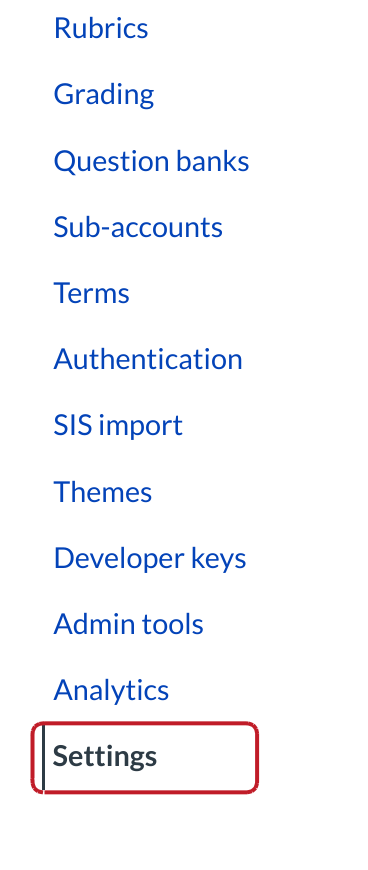
In Account Navigation, click the Settings link.
Open Reports
Click the Reports tab. Here you will see the default account-level reports available in Sublime LMS ™.
- Course Storage shows all the course for a given term.
- Grade Export shows the student final grade results for all students in a given term.
- LTI provides an export of data that shows LTI (Learning Tool Interoperability) usage information.
- Last User Access shows the last login for active users.
- Last enrolment activity report shows the last activity on a user's enrolments.
- MGP grade export shows grading period grades (and overall course grades) for each student enrolled in a given term.
- Outcome Results shows the learning outcome results for all students. This report also includes question banks.
- Outcome export shows all learning outcomes that exist within this account.
- Provisioning will export all the needed information that relates to provisioning Sublime LMS ™.
- Public Courses shows all the courses that are not deleted for a given term that are public.
- Recently Deleted Courses shows all the courses for a given term that have been deleted in the last 30 days.
- SIS Export will export all the needed files for Users, Accounts, Terms, Courses, Sections, Enrollments, Groups, Group Memberships, and Cross Listings.
- Student Competency shows the outcomes results for all students. For detailed reports, create outcomes at the account or sub-account level and add those outcomes to course activities. Course level Outcomes are not included in the report.
- Students with no submissions shows all students enrolled in a course in a given term that have not submitted an assignment between the given date range in a course.
- Unpublished Courses shows all the courses for a given term that are not published.
- Unused Courses shows all courses that have none of the following items: assignments, announcements, discussions, files, modules, pages, or quizzes.
- User access tokens shows users with access token.
- Zero Activity shows all the students enrolled in any courses in a given term.
Note: By clicking the Question Mark icon next to the report name, you can view help information regarding that report.
View Grade Export Help
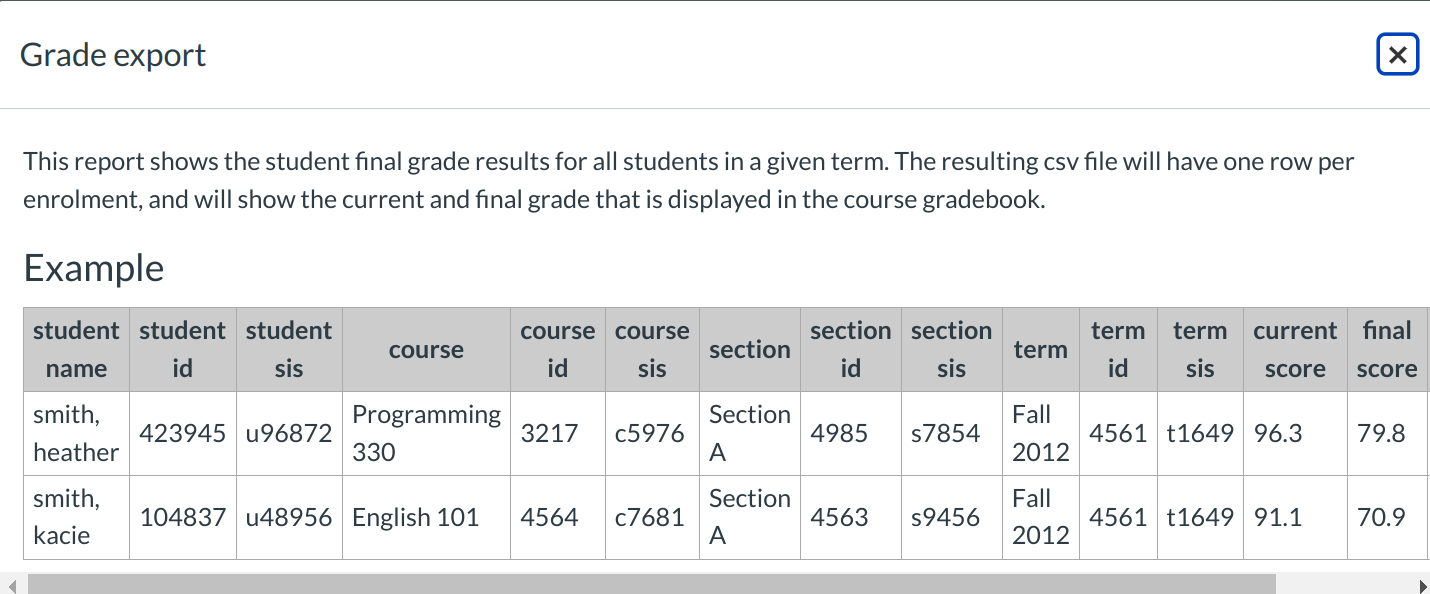
The Grade Export Report will show the final grade results for all the students in a term. The CSV file will have one row per enrollment and will show the current and final grade that is displayed in the course gradebook.
Configure Grade Export Report
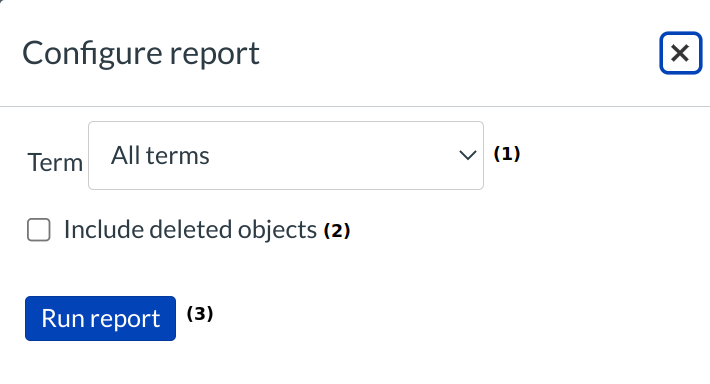
You can choose between All Terms, Default Term, or any other term that is created [1]. Courses with muted assignments may not accurately reflect scores in this report.
To include deleted objects, check the Include Deleted Objects checkbox [2]. Deleted objects may include deleted courses, users, or enrollments.
Click the Run Report button [3] when you are done.
View Report
Once you run the report, refresh your browser and click the download icon to view the report.
View Last User Access Help

The Last User Access report shows the last login for active users. The CSV file will have one row per enrollment and will show the date, time, and IP address where the user last accessed Sublime LMS ™.
Configure Last User Access Report
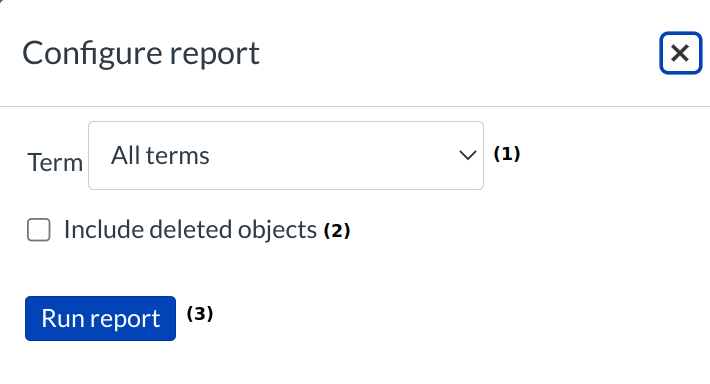
You can use the drop-down menu to choose between All Terms, Default Term, or any other term that is created.
Courses with muted assignments may not accurately reflect scores in this report.
Click the Run Report button when you are done choosing the term.
View Report
Once you run the report, refresh your browser and click the download icon to view the report.
View Outcome Results Help
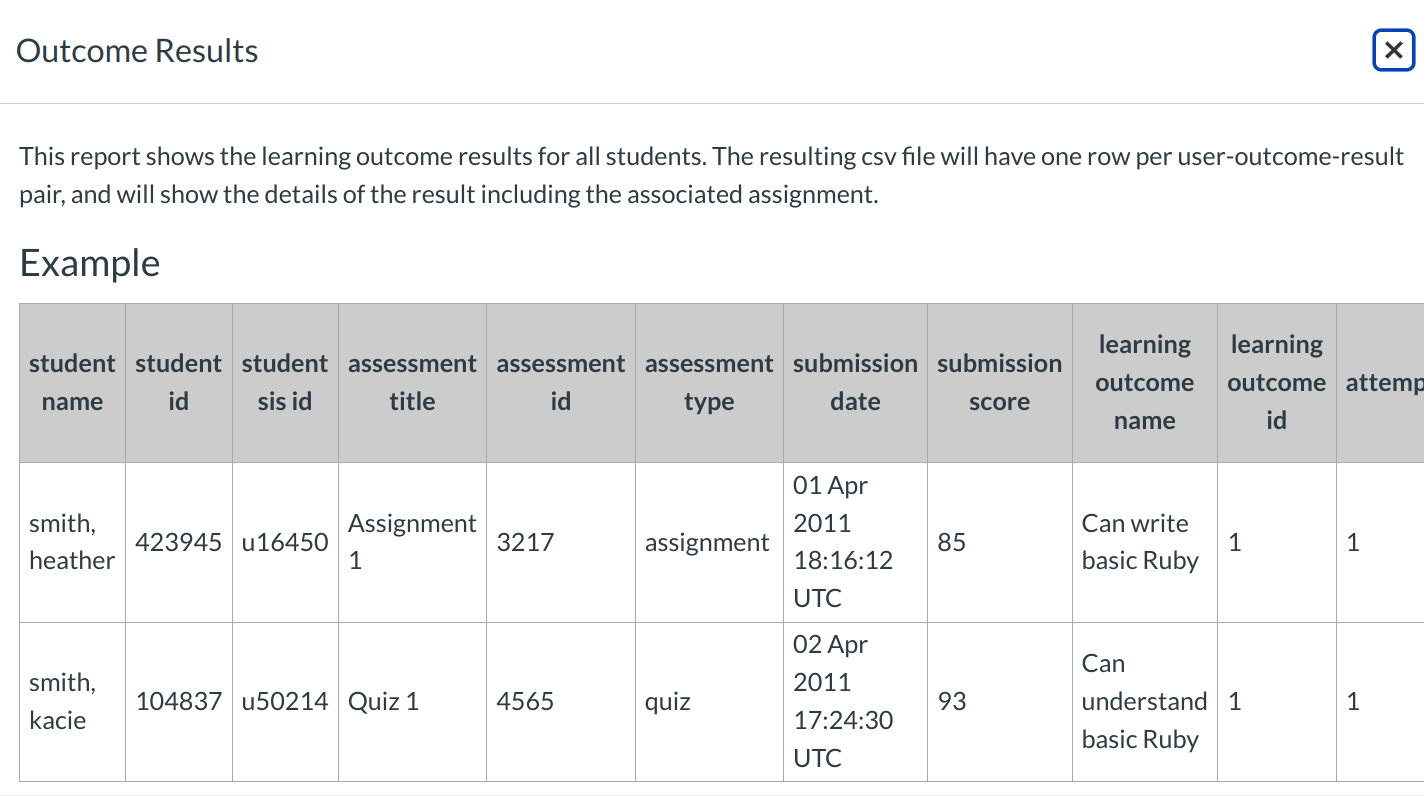
The Outcome Results report shows the learning outcome results for all students. The resulting CSV file will have one row per user-outcome-result pair, and will show the details of the result including the associated assignment.
Note: Outcome results are tied to level of outcome access. Account outcomes display on the account report, while the sub-account outcomes display on the sub-account report. The only time outcomes would be displayed on both reports is if they are stored in both accounts, such as copying an account outcome to the sub-account level. Outcomes created at the course-level display on the course-level and will not appear on account or sub-account level outcome reports.
Configure Outcome Results Report
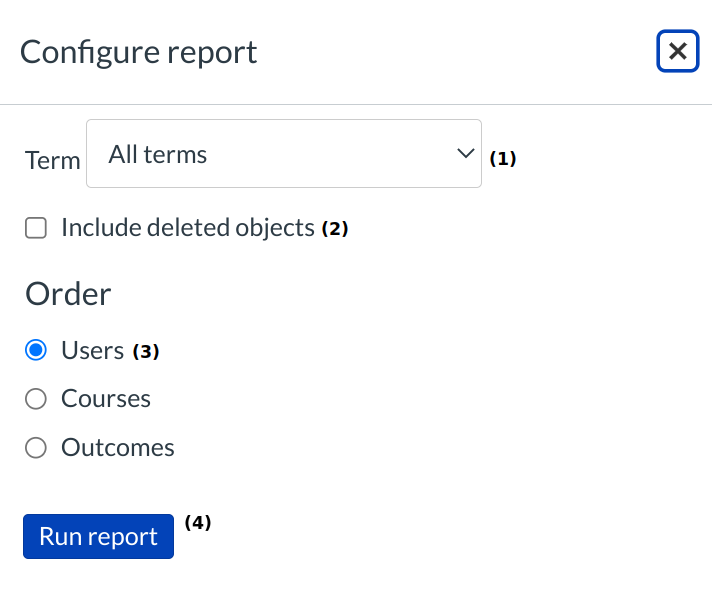
Select the term of the report you want to run [1]. You can use the drop-down menu to choose between All Terms, Default Term, or any other term that is created. Courses with muted assignments may not accurately reflect scores in this report.
To include deleted objects, check the Include Deleted Objects checkbox [2]. Deleted objects may include deleted courses, users, or enrollments.
Select the radio button for the option according to how you want the report to be organized [3]. You can order the report by users, courses, or outcomes.
Click the Run Report button [4] when you are done.
View Report
Once you run the report, refresh your browser and click the download icon to view the report.
View Provisioning Help
The Provisioning report will pull data from within Sublime LMS ™ without using SIS information. For example, you can now pull a report that has a list of your unpublished courses vs. your published courses, as well as a report that shows all your cross-listed courses in Sublime LMS ™.
Configure Provisioning Report
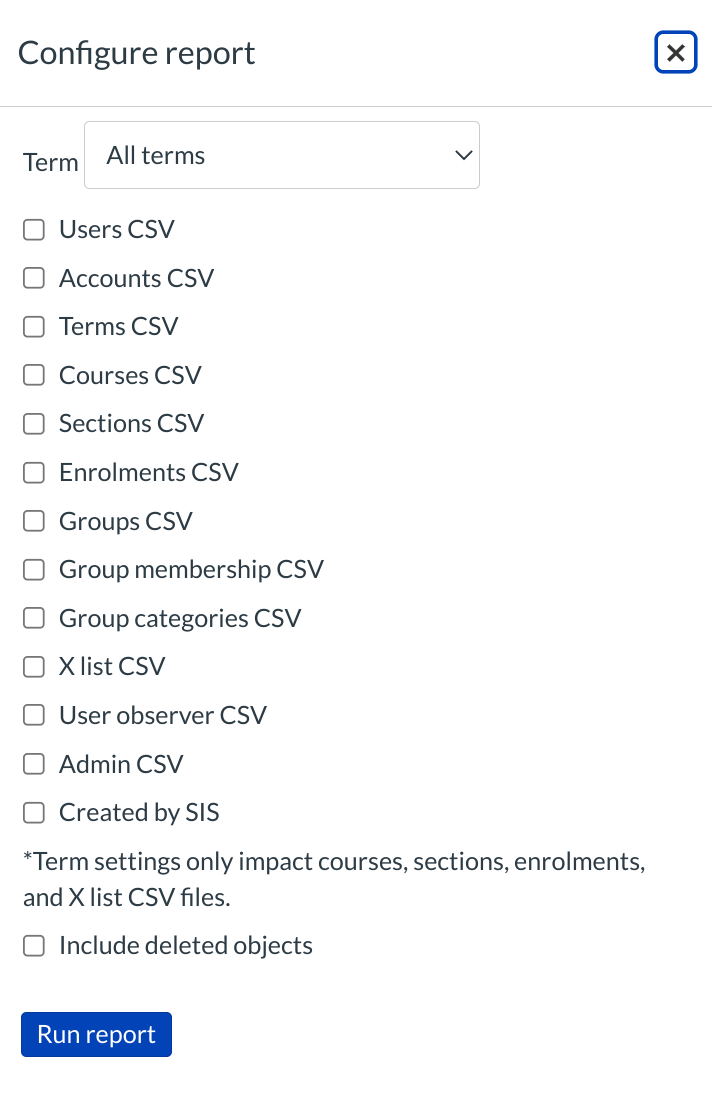
Click the checkbox next to each option you would like generated in your report. You can generate information about:
- Users
- Accounts
- Terms
- Courses
- Sections
- Enrollments
- Groups
- Group Memberships
- X list (cross-listing)
- Include Deleted Objects. Deleted objects may include deleted courses, users, or enrollments.
Note: Term settings only impact Courses, Sections, Enrollments, and Cross-listing.
Click the Run Report button when you are done choosing the options for the report.
View Report
Once you run the report, refresh your browser and click the download icon to view the report.
View Recently Deleted Courses Help
The Recently Deleted Courses report report shows all the courses for a given term that have been deleted in the last 30 days. The resulting CSV file will have one row per course and will show the course id, course sis id, course short name, course name, course start and end dates.
Configure Recently Deleted Courses Report
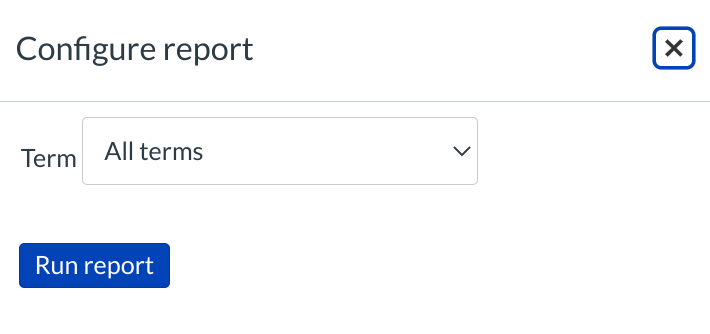
You can use the drop-down menu to choose between All Terms, Default Term, or any other term that is created. Courses with muted assignments may not accurately reflect scores in this report. Click the Run Report button when you are done choosing the term.
View Report
Once you run the report, refresh your browser and click the download icon to view the report.
View SIS Export Help

The SIS Export will export the needed files for Users, Accounts, Terms, Courses, Sections, Enrollments, Groups, Group Memberships, and Cross Listings for an SIS import.
Configure SIS Export Report
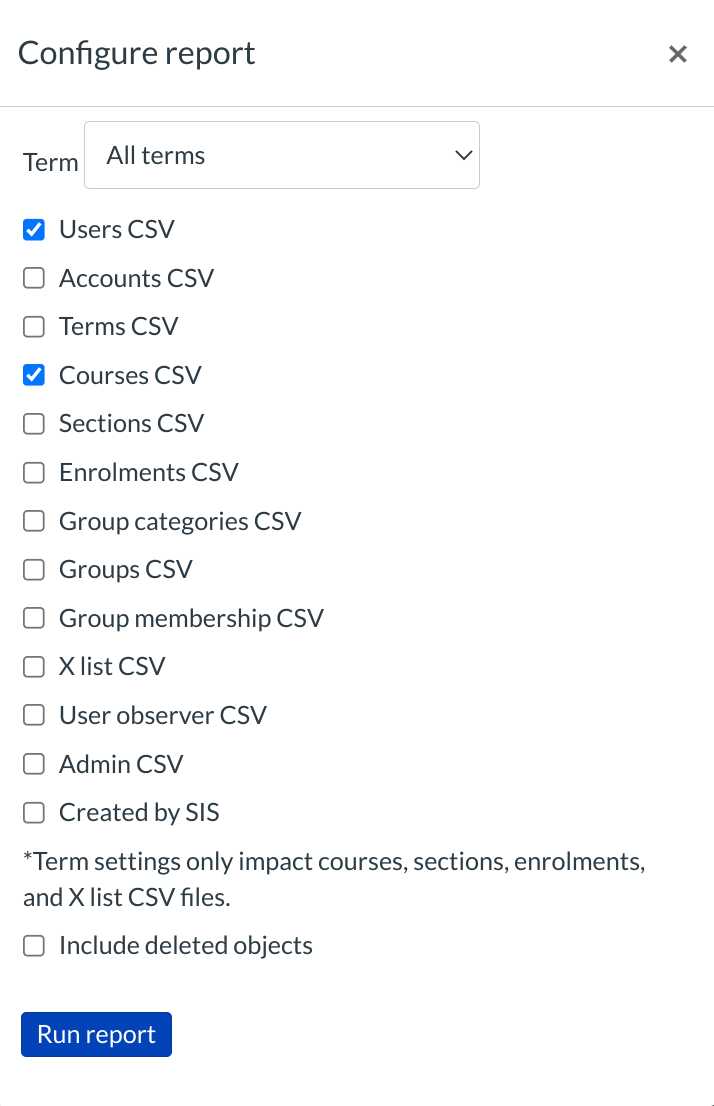
Click the checkbox next to each option you would like generated in your report. You can generate information about:
- Users
- Accounts
- Terms
- Courses
- Sections
- Enrollments
- Groups
- Group Memberships
- X list (cross-listing)
- Include Deleted Objects. Deleted objects may include deleted courses, users, or enrollments.
Note: Term settings only impact Courses, Sections, Enrollments, and Cross-listing.
Click the Run Report button when you are done choosing the options for the report.
View Report
Once you run the report, refresh your browser and click the download icon to view the report.
View Student Competency Help

The Student Competency report shows the outcomes for all students. For detailed reports, create outcomes at the account or sub-account level and add those outcomes to course activities. Course-level outcomes and outcomes tied to question banks are not included in this report.
Configure Student Competency Report
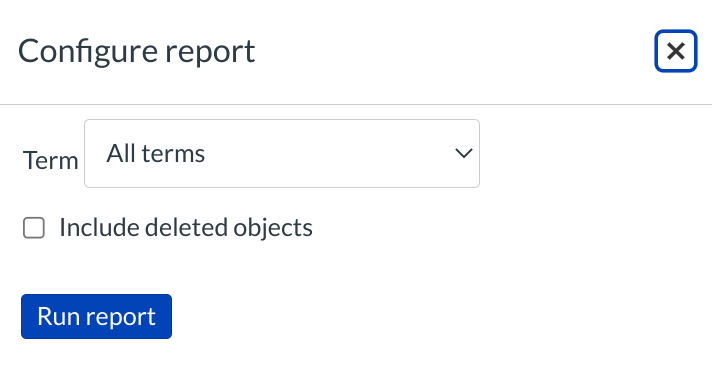
You can use the drop-down menu to choose between All Terms, Default Term, or any other term that is created [1]. Courses with muted assignments may not accurately reflect scores in this report.
To include deleted objects, check the Include Deleted Objects checkbox [2]. Deleted objects may include deleted courses, users, or enrollments.
Click the Run Report button [3] when you are done.
View Report
Once you run the report, refresh your browser and click the download icon to view the report.
View Students with No Submissions Help
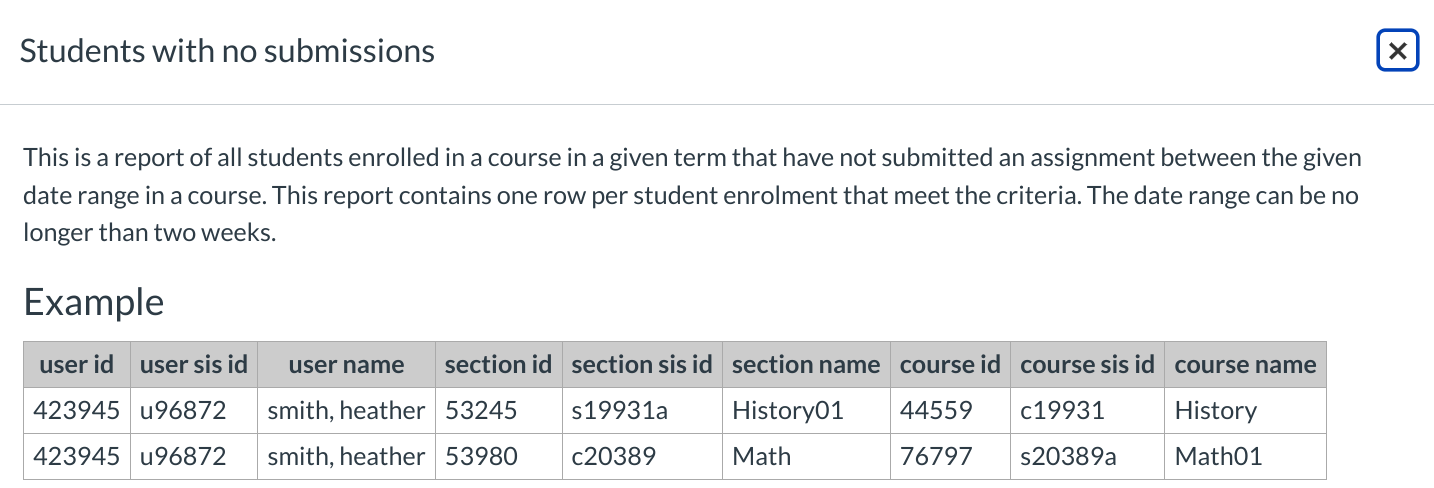
The Students with no submissions report shows all students enrolled in a course in a given term who have not submitted an assignment between the given date range in a course. This report contains one row per student enrollment that meet the criteria.
Configure Students with No Submissions Report
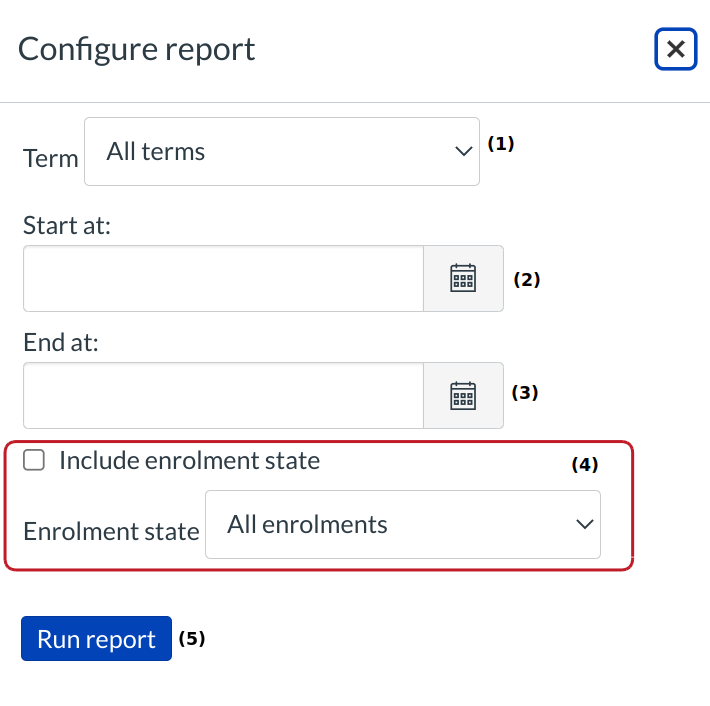
Select a term from the drop-down menu [1]. You can choose between All Terms, Default Term, or any other term that is created. Courses with muted assignments may not accurately reflect scores in this report
Choose a start date [2] and an end date [3] for the report by clicking on the calendar icons.
You may also choose to include the enrollment state in the report by clicking the Include Enrollment State checkbox and selecting an option from the drop-down menu [4].
Click the Run Report button [5] when you are done choosing the options for the report.
View Report
Once you run the report, refresh your browser and click the download icon to view the report.
View Unpublished Courses Help

The Unpublished Courses report shows all the courses for a given term that are not published. The resulting CSV file will have one row per course and will show the course id, course sis id, course short name, course name, course start and end dates.
Configure Unpublished Courses Report
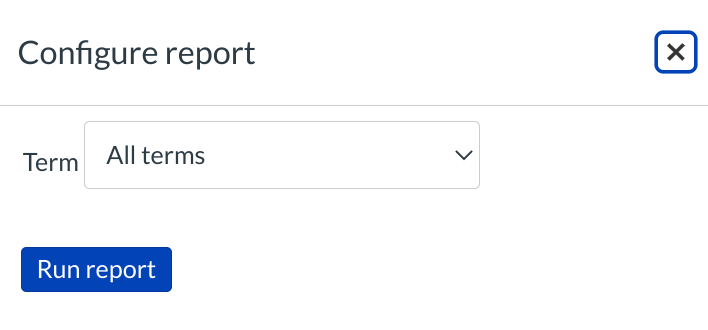
You can use the drop-down menu to choose between All Terms, Default Term, or any other term that is created. Courses with muted assignments may not accurately reflect scores in this report. Click the Run Report button when you are done choosing the term.
View Report
Once you run the report, refresh your browser and click the download icon to view the report.
View Unused Courses Help

The Unused Courses report shows courses that have none of the following items: assignments, announcements, discussions, files, modules, pages, or quizzes.
Configure Unused Courses Report
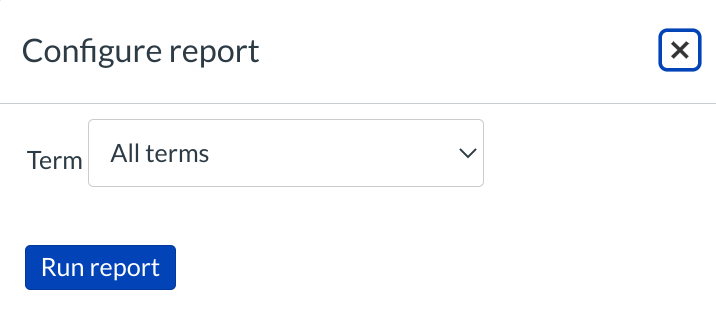
You can use the drop-down menu to choose between All Terms, Default Term, or any other term that is created. Courses with muted assignments may not accurately reflect scores in this report. Click the Run Report button when you are done choosing the term.
View Report
Once you run the report, refresh your browser and click the download icon to view the report.
View Zero Activity Help

The Zero Activity report shows all the students enrolled in any courses in a given term. Resulting CSV file will have one row per user enrollment that have not visited the course since the date.
Configure Zero Activity Report
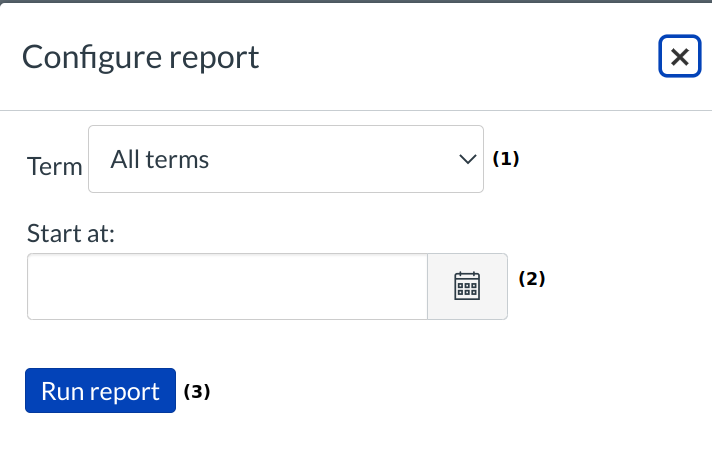
Select a term from the drop-down menu [1]. You can choose between All Terms, Default Term, or any other term that is created. Courses with muted assignments may not accurately reflect scores in this report.
Choose a start date [2] for the report by clicking on the calendar icon.
Click the Run Report button [3] when you are done choosing the options for the report.
View Report
Once you run the report, refresh your browser and click the download icon to view the report.
